Reinstalling Windows
A step-by-step guide for reinstalling Windows correctly
Guide: Step-By-Step Tutorial on Reinstalling Windows Correctly
All important files on your USB and your current Windows installation will be wiped. Be sure to back up any important files.
✔ What you will need:
A USB flash drive with at least 8 GB of free space
A Windows PC with internet access
The Media Creation Tool from Microsoft
Step 0: Preparing the USB flash drive
Plug in your USB flash drive
Backup any Important files - the drive will be erased during the preparation
Step 1: Download the Media Creation Tool
Under "Create Windows 10 or 11 installation media" click "Download Now".
Save the tool to your computer.
Step 2: Creating the Bootable USB Drive
Run the Media Creation Tool.
Accept the license terms.
Select "Create installation media (USB flash drive, DVD, or ISO file) for another PC", then click Next.
Choose your preferences:
Language
Edition (Windows 10 or 11)
Architecture (64-bit is most common)
Select "USB flash drive" and hit Next.
Pick your USB stick from the list and then hit Next.
The Media Creation Tool will download Windows and prepare the USB drive for reinstallation. The process may take some time, depending on your internet speed.
Step 3: Reinstalling Windows (Standart SATA/NVMe Setup)
Go into settings and go onto "Update & Security" then onto "Recovery"
Now under "Advanced startup" click "Restart now"
Now click "Use a device" and select your USB flash drive from the list

If you don't see your USB drive here, or if you boot back into Windows, do the following:
Go into your BIOS
Go to the "BOOT" tab
Go change the "BOOT option #1" to your USB.
Now, in the Windows installation, under "Language to Install" select your desired language. The rest will be automatically selected for you.
Click "Install Now" and when prompted to enter an activation key, click "I don't have a product key"

When prompted to select a Windows version, choose Windows 10 or 11 Pro.

After selecting the version, you'll be prompted to choose between upgrading or performing a custom install. Select "Custom: Install Windows only (advanced)".

Now on the screen where you want to partition your disks, on your keyboard press SHIFT + F10

In the console, type this command:
diskpartType
list diskand select the disk with the most GB, or the one where you know your game is installed.Then type
select disk x, and replace the "x" with the number of your diskNow type
clean
Exit out of the console and follow the rest of the Windows Setup
Step 3.5: Reinstalling Windows (RAID Setup)
Step 0: Before you start, ensure you have:
Windows 10 or 11 installation media (USB created with Media Creation Tool).
RAID drivers for your motherboard:
Intel: Usually called
Intel Rapid Storage Technology (IRST)AMD: Usually called
AMD RAIDXpert2Download from your motherboard or system manufacturer's website.
A USB flash drive with the RAID drivers extracted into a folder
Step 1: Windows Setup
Follow all the steps listed above up to step 8.
Step 2: Load RAID Drivers
When asked "Where do you want to install Windows?", your RAID volume might not appear yet. To fix this problem, do this:
Click on "Load driver".

Click Browse, and then go to your USB with the RAID drivers.
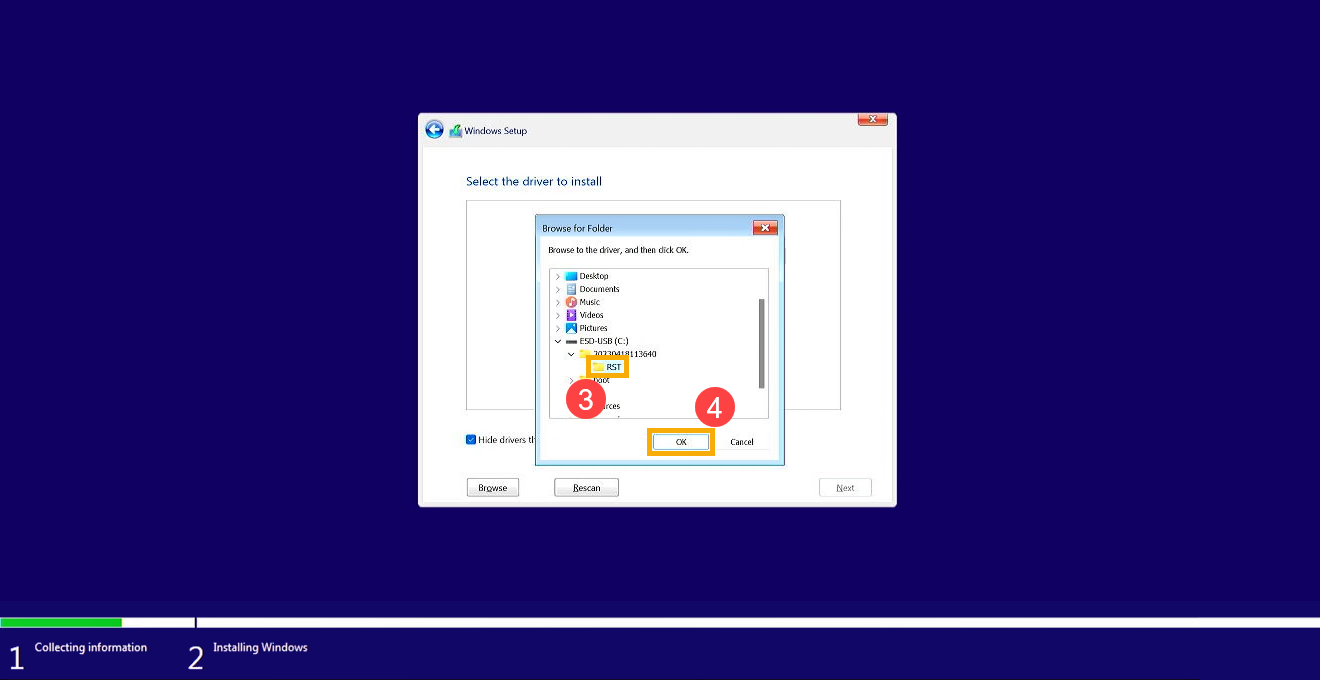
Select the correct driver (usually labeled as Intel RAID Controller or AMD RAID Controller) and click Next.
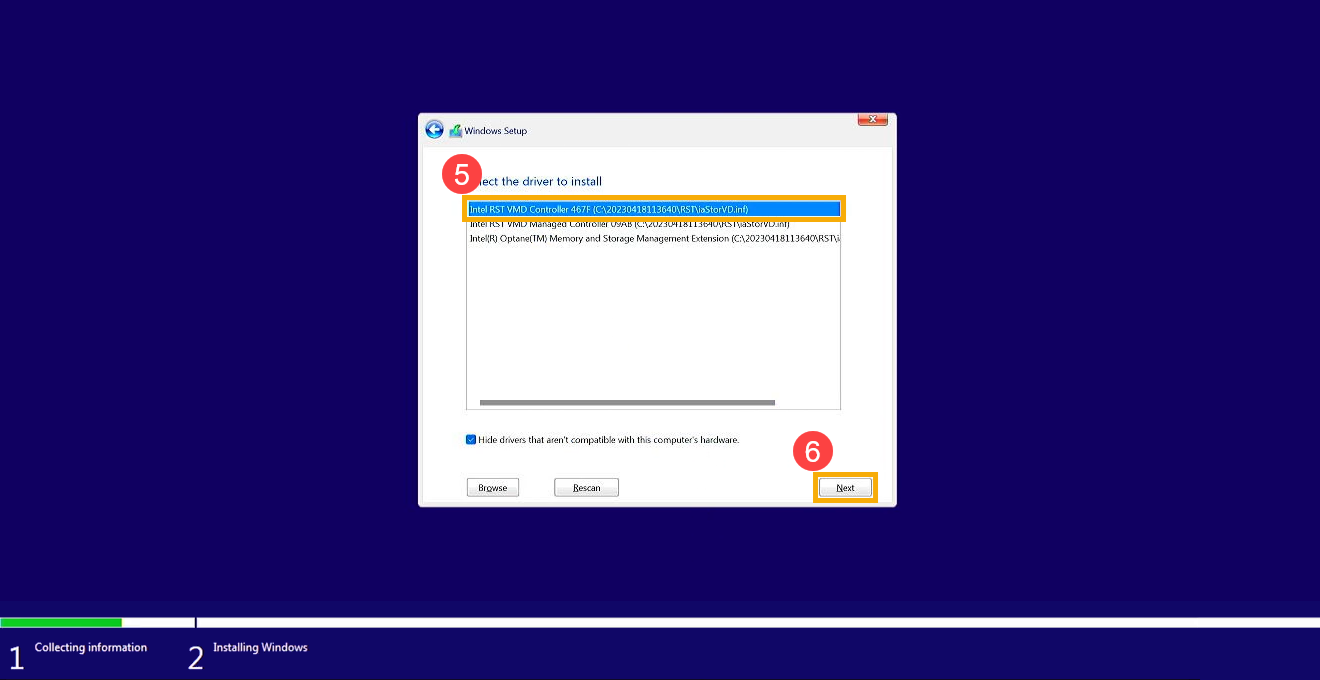
Continue following the steps from the standard Windows installation.
Post-Install Tips
After a successful Windows Installation, go install the chipset and RAID drivers again from your motherboard's site.
Check if RAID is working, by opening the Device Manager and confirming your RAID controller is listed.
Last updated